In the Main Window click New Schema Profile
 Creating a Schema Profile
 throws what looks like a TON of information that you have to fill out, but it's really not. All you really need is a NAME, a , and a connection to a MySQL Server database to get started. You WILL need to add some type of Data Source for HL7 messages (either files in a folder OR over TCP/IP OR both!), but to start with what's shown above is all you need.
Click the Edit / Test Your MySQL Connector Settings button to bring up the MySQL Connector window.
 Connecting to MySQL
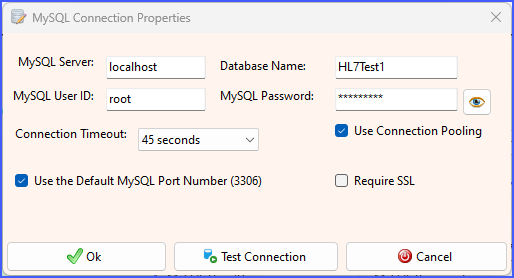 Connecting to MySQL
|

Creating a Schema Profile
The Add / Edit a Schema Profile window is broken up into 3 sections on the vertical and 3 Parts Horizontally. The Top and Bottom of the window are the Header and Footer sections. While the middle section of the window is made up of 3 tabs which contain your profile's main runtime properties. We're going to look at the Top and Bottom first and then go through Parts 1
Form Header:

Add / Edit Profile Header
In the Header you only have to enter 2 things.
•A Name for your Schema Profile which can be anything you like as long as it doesn't conflict with the name of another of your Schema Profiles.
•The .
•NOTE: Make sure that you give some thought to your Schema Prefix, once you SAVE your Schema Profile you won't be allowed to change it.
Form Footer:

Add / Edit Profile Footer
In the Footer you have 2 items you can change.
•You Enable or Disable the Schema Profile
•And you can change which Windows Service is going to run the Schema Profile. You can choose a PRIMARY Service instance (1 to 3) OR you can opt for a Private Service. Of course this only matters if you are using a License which ALLOWS you to run the MS Windows Services. See Running the Services for more information.
Of course, in the Footer you also have the  Save Profile button which will become enabled anytime you make a change to any field.
Part 1: MySQL Connection Properties

Creating a Schema Profile: Part 1
In Part 1 you configure your MySQL Server Connection information and enable or disable Schema Maintenance.
SQL Connection Information:
Click the Edit / Test Your MySQL Connector Settings button to bring up the MySQL Connector window.
Connecting to MySQL
Connecting to MySQL
Anyone who has worked with MySQL before will recognize these properties, as they are very common. You need to enter a MySQL Connection to the database which will contain your .
NOTE: This software does NOT create MySQL Databases. You have to create the database (or use an existing one).
Once you've entered these values test them by clicking the  Test Connection button. Test Connection button.
|
IMPORTANT NOTE: When you configure your MySQL Connector you MUST make sure that the MySQL User ID you use has FULL RIGHTS to the database. You don't have to use the built-in account, but the ID that you do select will need to do a lot, creating tables, modifying tables and columns, etc (See Schema Training for more information).
Database Maintenance:
If you want the Schema Engine to perform automated database maintenance (we recommend it) as it's running just check Enable Database Maintenance and fill out the remaining values. You can see Schema Maintenance for a detailed explanation of how the CORE HL7 MySQL Schema Engine approaches database maintenance.
Part 2: Runtime Processing

Creating a Schema Profile: Part 2
In Part 2 you have 2 sections.
Section 1: Schema Tables Creation and Verification
The HL7 Definition. You have only 3 choices, a Truncated definition based on version 2.2 of HL7, the ANSI Default version 2.3 definition and the ANSI default version 2.5.1 definition. IMPORTANT NOTE: The HL7 Definition is ONLY used when creating your Schema Tables (See Creating Schema Tables). The value you select will only affect how many are INITIALLY created.
The Default Column Size. When your Schema Tables are created AND if new Schema Tables or Columns are created during Schema Training we will use the value you select here as the initial column size.
When you check the Run a Stored Procedure After Import box the inbound processors will execute a SQL Stored Procedure AFTER every successful import operation. You might find this method easier to implement than using database triggers (which we do NOT recommend). Using this method the Schema Engine will never execute the stored procedure until each HL7 message is completely and safely loaded into your . There are rules for how the stored procedure must be named and what parameter types it can accept. For example, if your is ZZZ then your stored procedure name MUST be ProcessZZZInboundMessage, and it MUST accept only 1 parameter, and that parameter MUST be a varchar(50). If you check the Run a Stored Procedure After Import box AND you haven't created your stored procedure your Schema will not run.
EXAMPLE STUB STORED PROCEDURE: = AAA
/*
Below is a 'stub' example of a stored procedure which is compliant
with the CORE HL7 MySQL Schema Engine.
You can paste this code into a MySQL Workbench Query Window and run it.
*/
USE <DATABASE>;
DELIMITER //
CREATE PROCEDURE `Process<>InboundMessage` (messageGUID varchar(50))
BEGIN
/* Your Code to Extract Data */
/* Your Code to Extract Data */
/* Your Code to Extract Data */
/* Your Code to Extract Data */
/*
Finally you should update the Processed Column in the
main HL7Data table to a non-zero value as shown below.
*/
Update <>_HL7Data Set Processed = 1
Where MessageID = messageGUID;
END //
DELIMITER ;
|
Section 2: HL7 Import Settings
Check for Duplicate Messages. This value determines behavior when importing HL7 messages. See the topic on Message Uniqueness for more information.
Keep Segments in the .
Folders and File Extensions to Monitor. Here is the primary setting for importing HL7 messages into the database from files on the file system. You can have up to two (2) different Folder / File Extension pairs in this setting and you use the  and and  buttons to add or remove folders. When running your Schema Profile will monitor all of these folders SIMULTANEOUSLY for HL7 data files that match the extension you select and import all messages in those files into your database. It does not matter whether the files each contain only 1 message or more than 1 message. buttons to add or remove folders. When running your Schema Profile will monitor all of these folders SIMULTANEOUSLY for HL7 data files that match the extension you select and import all messages in those files into your database. It does not matter whether the files each contain only 1 message or more than 1 message.
|
Part 3: HL7 Message Settings & TCP/IP

Creating a Schema Profile: Part 3
In Part 3 you will select the HL7 Message Envelope settings. These are:
•BOM. The beginning of message character(s). All HL7 messages sent to this listener must begin with this character(s). The ANSI HL7 standard is a single Hex (0B) character
•
•EOM. The end of message character(s). All HL7 messages sent to this listener must end with these character(s). The ANSI HL7 standard is a Hex (1C) followed by a Hex(0D)
•
•SOM. The HL7 message segment delimiter. HL7 messages are made up of 'Segments'. The segments must be separated by this character(s). The ANSI HL7 standard is a single carriage return character (a Hex(0D) ).
These three values are displayed in HEX. To change click the  button next to the value you want to change. button next to the value you want to change.
•Field Delimiter. This is the character used as the field delimiter in HL7 messages you expect to receive.
IMPORTANT NOTE: You should typically NEVER have to changes any of these values from their ANSI HL7 Default values unless you have a very specific reason to do so. Which, if you do, you will understand what you're doing and why. If the values are ever NOT set to their ANSI values the Reset Envelope to ANSI HL7 Default Values button will be enabled and you can just click it to restore all 4 of these settings.
See TCP/IP Listener for information about enabling the TCP/IP Listener.
|
Your Next Steps
•See how to create your database schema tables.
•Review Schema Database Maintenance and how it works.
•Explore how the TCP/IP Listener works.
•Review Schema Training.
•Go back and review the Main Window features.
•Learn how to configure the Global Settings.